
Kimura lock to half butterfly hoot sweep
The T-kimura and taking the back
Hammerthrow sweep to T-kimura to armbar
T-kimura to back triangle
Standing dive pass to T-kimura to side kimura finish
Whizzer defence + footgrab
Using own foot to block foot
The roll through
The limp arm
The limp arm finishing with back
Triangle setup
The basic idea - “ankle guard” + 2 best options
Two battles - knee position + underhook
Entry from kneeride
Entry from standard halfguard
Entry from bottom mount (elbow escape)
Entry from bottom side control
Spin under vs smash pass
Kneecut from holding position
Straight staple (inside) to kneeslide
Double staple to mount
Double staple to backside
Passing 1/4 guard - kneecut + vegan mount
Chaining back and forth with kneecut
Float pass - leg pummel to kneeride
From front headlock - Figure 4 grip start
From front headlock - Elbows grip start
From front headlock - Gable grip start
Leg assist
Halfguard pass + leg assist
Finishing with 3/4 guard
The Monty Python
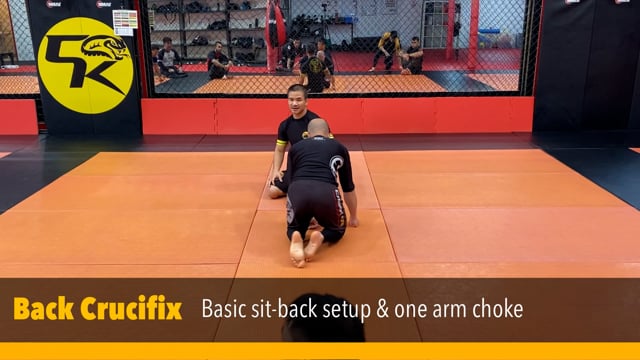
Basic sit-back setup & one arm choke
Bridge counter to straight jacket
Belly down crucifix one arm choke
Belly down crucifix to straight jacket
Belly down back crucifix armlock
Belly up back crucifix armlock & straight jacket
Setup vs bottom side control escape to knees
Setup vs halfguard, using as a pass
Mounted finish
Halfguard to mounted guillotine
Sweeping to mount vs 3/4 roll escape
Sweep/finish when opponent raises head
10 finger guillotine (standing)
10 finger guillotine (supine)
1 inch grip
Entry from front headlock position
Finishing with the arm in
Entry from top side control vs underhook escape
Front north south + mounted guillotine preview
Using kneeshield to get the underhook
Kneeshield entry to kimura
The legover kimura
Reverse triangle from legover kimura
Armbar from legover kimura
Hammerthrow sweep + back take
Far side armbar
Side kimura
Far side armbar from kimura
Head arm choke (kata gatame)
Taking the back from head arm choke
Bulldozer sweep
Bulldozer sweep grabbing leg
Spin under escape
Hip pull counter from spin under escape
Summary - Escaping to knees
North south escape - framing to guard
North south escape - belly down headlights to knees
Retaining guard or escape to knees
Framing to Elbow Escape to guard
Framing vs basic side control
Framing vs sitout side control
Framing vs reverse sitout side control
Lever sweep + taking the back
Armdrag escape
Spin under escape
Setting up from half guard
Undercut sweep
Coming up to knees to dogfight + knee tap
Dealing with the whizzer + back door old school
Old School sweep
Old School leg bundle
Two knees on one shin - scissor
One knee on one shin - scissor
One knee on one shin - scissor vs half butterfly hook
High step - scissor vs half butterfly hook
Scissor summary
Dealing with closed halfguard
Can’t step over knee - knee through
Armbar from guard using toplock
Swivel sweep to put them on their back
Armbar switch drill vs elbow slip
Spinunder armbar leg grab rollover
Armbar > sweep > switch > 3/4 juji armbar
Armbar finish using shoulder triangle
Control and cross chest grip break (gable grip)
Cross chest grip break vs figure 4 defence
Armbar switch drill vs elbow slip
3/4 Juji and triangle choke
Triangle setup beforehand + pulling them up